


WEATHER CONDITIONS, TEMPERATURE AND HUMIDITY DURING WORK
Work should be carried out in dry conditions, at an air and base temperature of +5°C to +30°C and a relative air humidity of at least 50%.
When performing façade work, avoid applying the reinforcing base and bonding the flexible shingles to façade areas exposed to direct sunlight, wind, and rain. To this end, scaffolding or the building façade should be covered with a special mesh or film, and gutters should be installed on the building. The reinforcing base and the bonding layer for the flexible shingles must be protected from direct exposure to water and from drying out for at least three days after application.
Features of using flexible tiles (component № 1): Flexible clinker/flexible brick becomes flexible at temperatures ≤ +20°C. At lower temperatures, the tiles lose their flexibility and may become brittle when bent. Therefore, before use, keep the flexible tiles in a warm room until they warm up. If bending tiles in cold weather is necessary, it is recommended to heat them with a heat gun.
Specifics for using the repair mixture (component No. 2): the repair mixture must be stored and transported at a daily ambient temperature of at least +3°C. The repair mixture must dry on the façade at a temperature of +20°C within 24 hours of application.
Adhesive-grout application guidelines (component № 3): All adhesive-grout quality indicators are valid at an ambient temperature of +20°C and a relative humidity of 60%. Under other conditions, the shelf life and setting time of the adhesive mixture may change.
TOOLS
|
 |
PREPARATION OF THE BASE FOR TILE APPLICATION
By the start of cladding work, all work that could result in damage to the surfaces being clad must be completed.
The substrate must be dry and sound, with no visible damage. Before applying the grout-adhesive (component #3), the substrate surface must be cleaned of dust, dirt, drips, paint residue, oil stains, and other substances that could reduce the adhesion of the grout to the substrate. Brittle, weak areas of the surface must be removed. Minor defects and uneven surfaces should be smoothed out with adhesive mixture. Large defects should be smoothed out with plaster mortars for vertical surfaces or PRR (concrete repair mortars) for general-purpose applications.
Mineral wool, foam, and expanded polystyrene should be reinforced with façade mesh at least 24 hours before tiling. For the reinforcing layer, use only building mixtures and alkali-resistant mesh specifically designed for these materials, and follow the application instructions. The quality of the base reinforced layer is checked visually. The surface must be smooth, without visible ridges or depressions. These defects may subsequently become apparent when applying the decorative layer. The maximum difference in level over a meter should not exceed 2 mm.
Once the reinforced layer has dried, which should be no sooner than 2-3 days (depending on weather conditions), you can begin applying the primer. Priming is critical for adhesive adhesion. To ensure reliable adhesion of the adhesive solution to the substrate, apply primers according to their intended purpose:
MARKING OF THE SURFACE ACCORDING TO TILE FORMATS
|
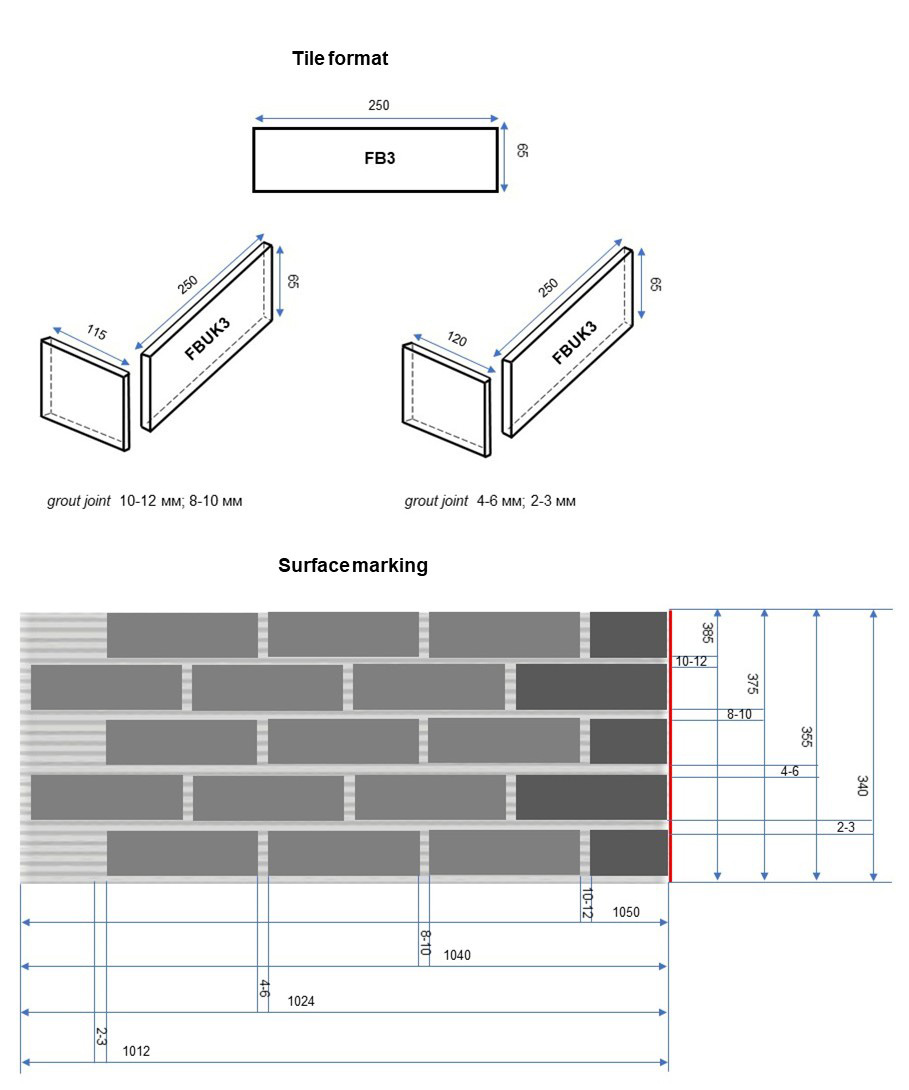
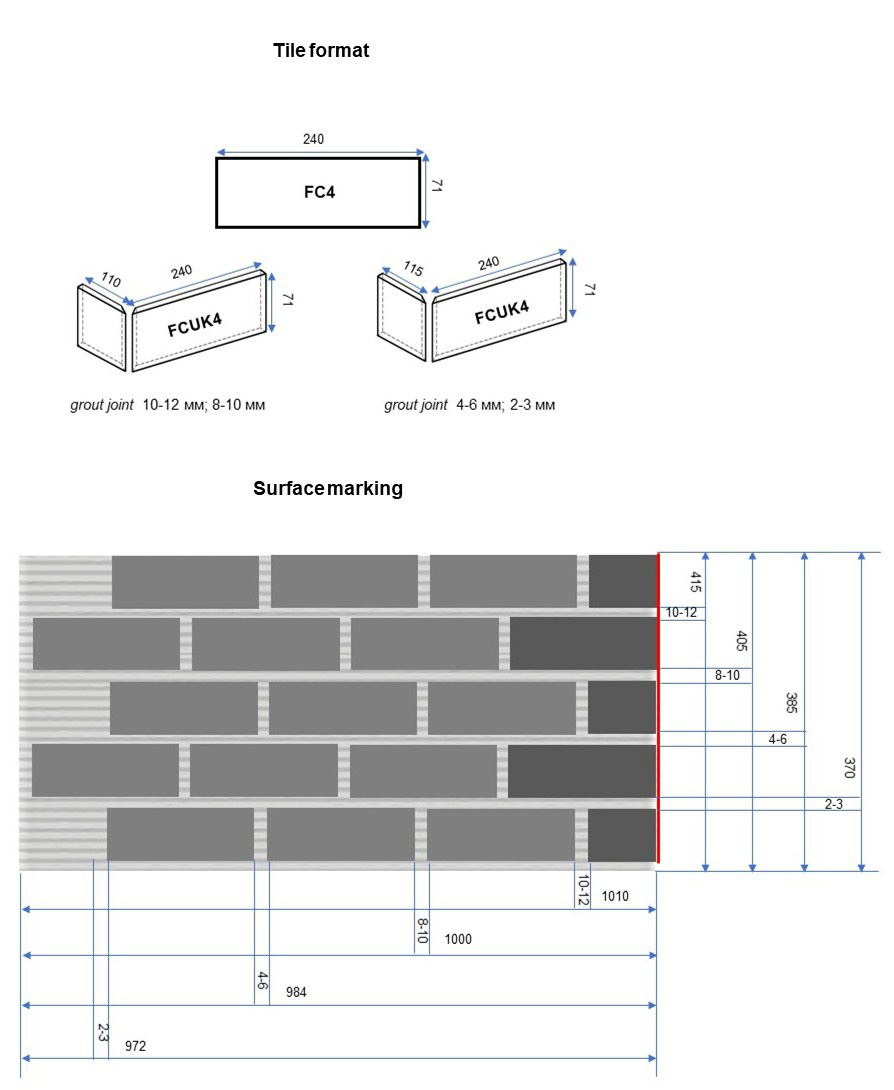
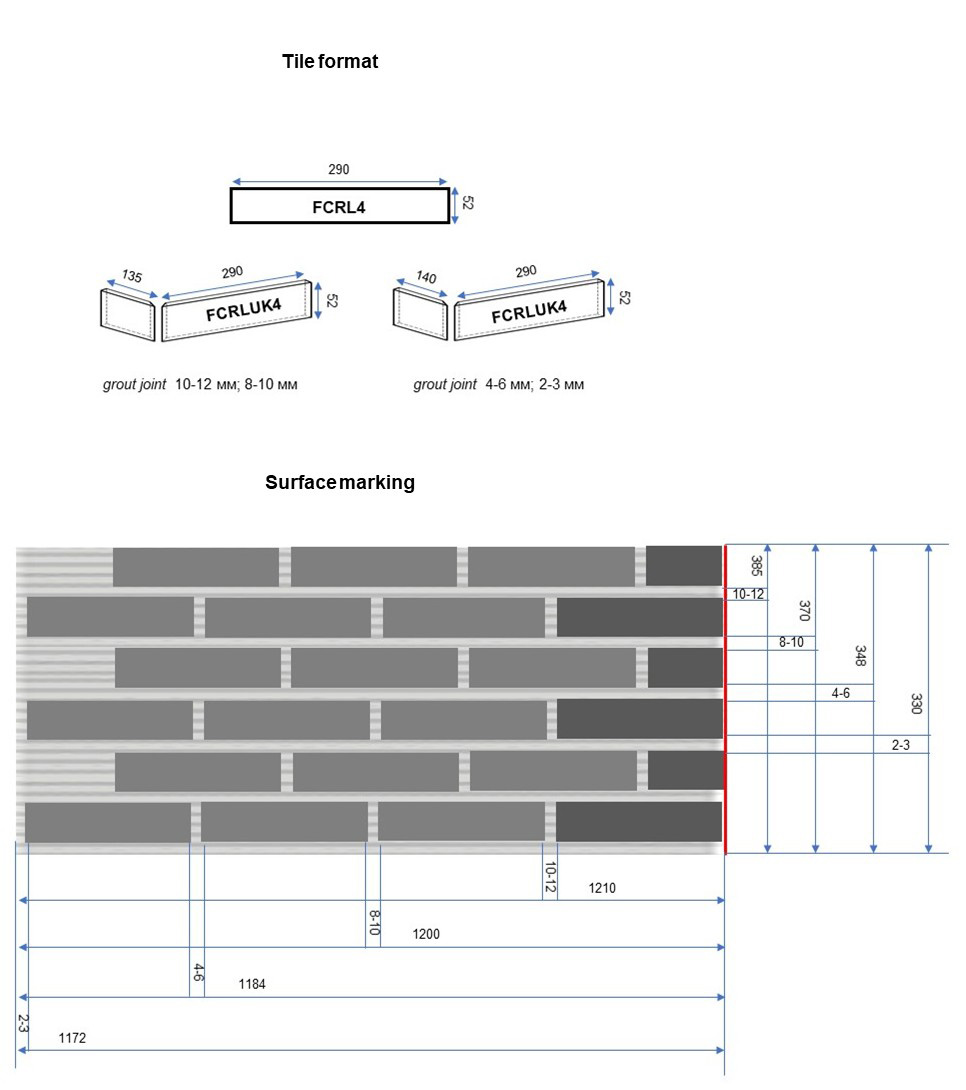
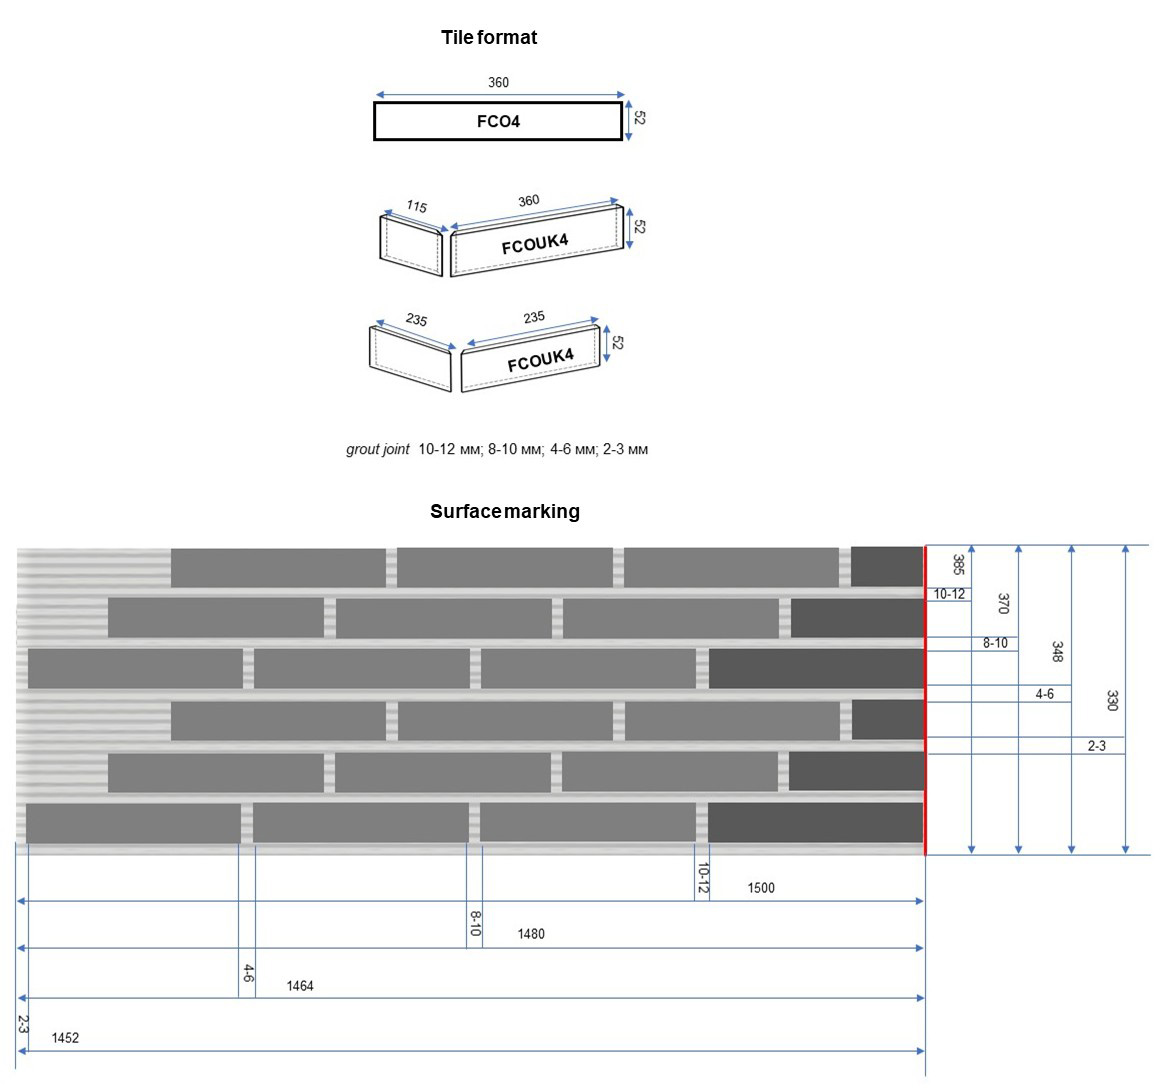
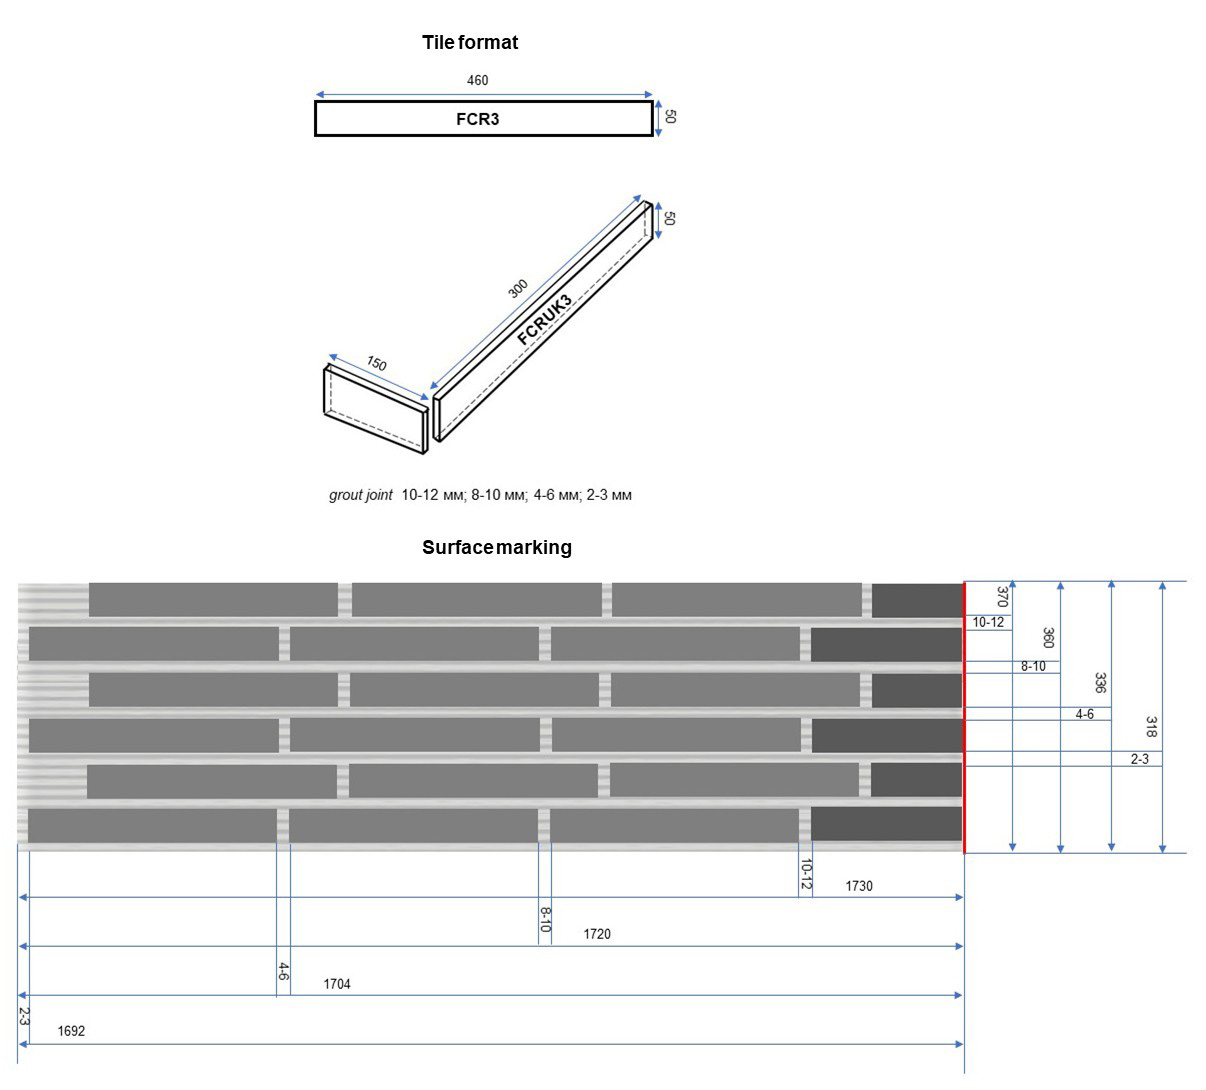
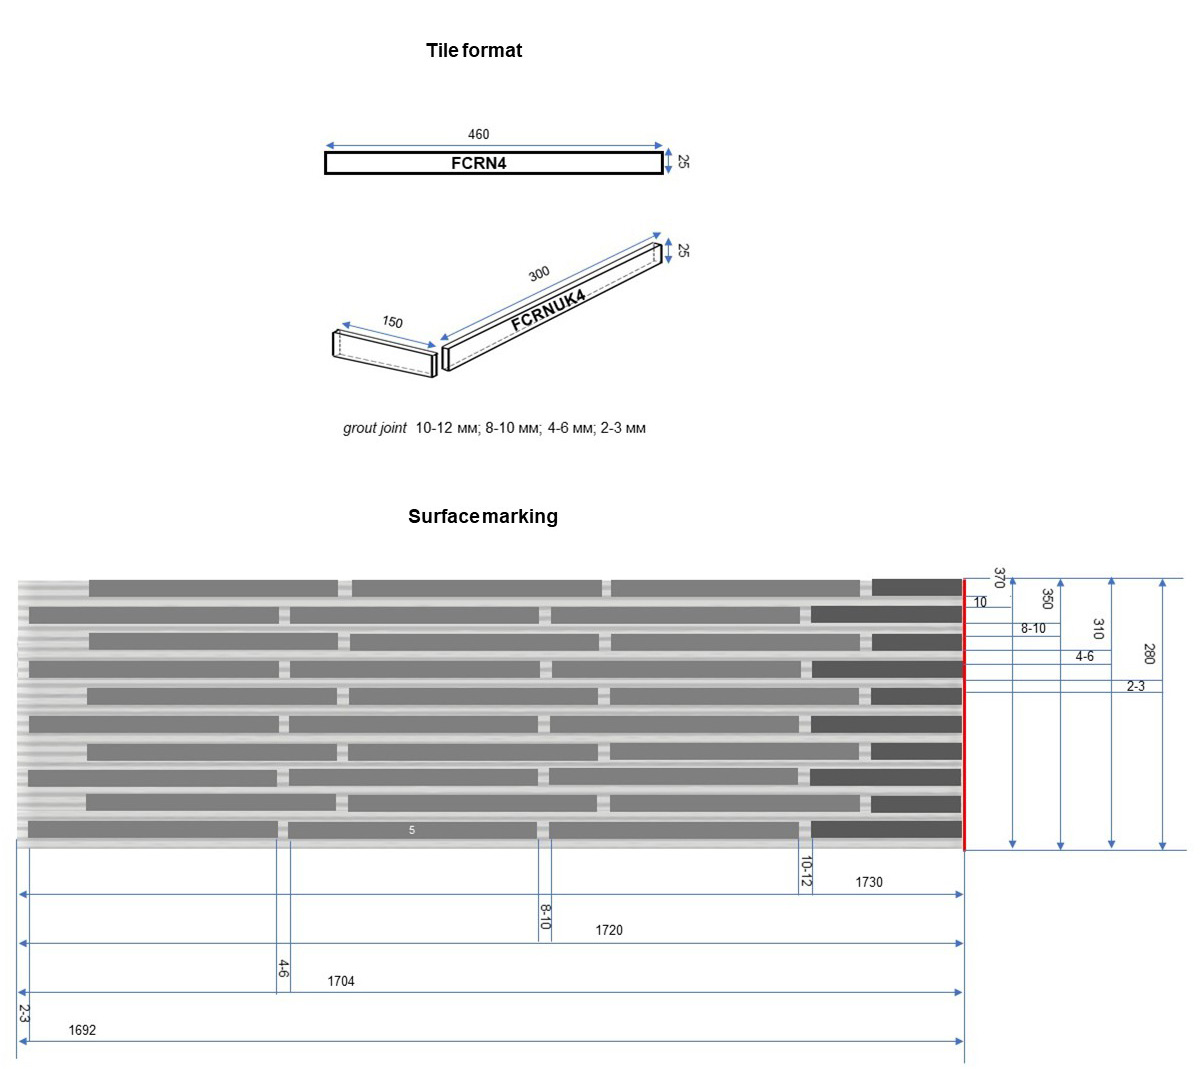
Marking the facade for tiles is a preparatory stage that involves creating horizontal and vertical lines using a laser level or cord. Marking starts from the windows or plinth, calculating the width of the tile and joints to ensure even installation. Accurate marking avoids distortions and minimizes tile trimming.
For facades, accurate marking of guide lines in horizontal planes is required. Be sure to calculate the number of bends and the width of the joints. Please note that the installation of flexible tiles should start from the upper corner of the house.
|
|
|
Establishing a baseline: Start at the lowest point (usually the baseboard) or windows, checking for level. Vertical and horizontal lines: Use a laser level or reflective string to draw guiding lines across the entire area, taking into account the width of the tile and the seam.
|
|
|
Horizontal tile trimming: to align the lines, horizontal trimming of the tiles is allowed in the basement row and near the cornice. This is appropriate when the windows are at different levels.
Vertical tile trimming: measure the distance between the corner of the house and the window or, in its absence, between the opposite corners of the house and calculate the number of tiles to be laid. Set the point where the tile will be trimmed and draw a vertical line for two rows of tiles. Lay the first row of tiles, trimming one of the tiles along the marked vertical line. In the next row, the tile placed below the trimmed one should be the same size and centered along the seam. Choose a different point for trimming the tile every two rows, so the offset of the seams will be invisible on the facade.
|
|
 |
|

Surface marking according to flexible tile formats:

MATERIAL CONSUMPTION STANDARDS
|
tile format |
tile size/mm |
seam width/mm |
consumption pcs/ m² |
|
|
FВ3 |
250Х65 |
10-12 |
50 |
|
|
8-10 |
52 |
|||
|
4-6 |
56 |
|||
|
2-3 (seamless) |
59 |
|||
|
FC4 |
240Х71 |
10-12 |
48 |
|
|
8-10 |
50 |
|||
|
4-6 |
53 |
|||
|
2-3 (seamless) |
56 |
|||
|
FCL4 |
240Х52 |
10-12 |
62 |
|
|
8-10 |
65 |
|||
|
4-6 |
70 |
|||
|
2-3 (seamless) |
75 |
|||
|
FCRL4 |
290Х52 |
10-12 |
52 |
|
|
8-10 |
54 |
|||
|
4-6 |
59 |
|||
|
2-3 (seamless) |
62 |
|||
|
FCO4 |
360Х52 |
10-12 |
42 |
|
|
8-10 |
44 |
|||
|
4-6 |
48 |
|||
|
2-3 (seamless) |
50 |
|||
|
FCR3 |
460Х50 |
10-12 |
35 |
|
|
8-10 |
36 |
|||
|
4-6 |
39 |
|||
|
2-3 (seamless) |
41 |
|||
|
FCRN4 |
460Х25 |
10-12 |
58 |
|
|
8-10 |
61 |
|||
|
4-6 |
70 |
|||
|
2-3 (seamless) |
78 |
|
corner element format |
dimensions of corner elements/mm |
seam/mm |
сonsumption| pcs. tiles | for 1 pair |
сonsumption | pairs of corner elements |
number of square meters per 1 linear meter |
|
FВUK3 |
115Х65 + 250Х65 |
10-12 |
1,5 |
13 |
0,375 |
|
8-10 |
14 |
||||
|
120Х65 + 250Х65 |
4-6 |
14 |
|||
|
2-3 (seamless) |
15 |
||||
|
FCUK4 |
110Х71 + 240Х71 |
10-12 |
1,5 |
12 |
0,360 |
|
8-10 |
13
|
||||
|
115Х71 + 240Х71 |
4-6 |
13 |
|||
|
2-3 (seamless) |
14 |
||||
|
FCLUK4 |
110Х52 + 240Х52 |
10-12 |
1,5 |
16 |
0,360 |
|
8-10 |
17 |
||||
|
115Х52 + 240Х52 |
4-6 |
18 |
|||
|
2-3 (seamless) |
19 |
||||
|
FCRLUK4 |
135Х52 + 290Х52 |
10-12 |
1,5 |
16 |
0,435 |
|
8-10 |
17 |
||||
|
140Х52 + 290Х52 |
4-6 |
18 |
|||
|
2-3 (seamless) |
19 |
||||
|
FCOUK4 |
115Х52 + 360Х52 235Х52 + 235Х52 |
10-12 |
1,3 |
8 |
0,477 |
|
1,7 |
8 |
||||
|
115Х52 + 360Х52 235Х52 + 235Х52 |
8-10 |
1,3 |
9 |
||
|
1,7 |
8 |
||||
|
115Х52 + 360Х52 235Х52 + 235Х52 |
4-6 |
1,3 |
9 |
||
|
1,7 |
9 |
||||
|
115Х52 + 360Х52 235Х52 + 235Х52 |
2-3 (seamless) |
1,3 |
10 |
||
|
1,7 |
9 |
||||
|
FCR3 |
150Х50 + 300Х50 |
10-12 |
1 |
16 |
0,458 |
|
8-10 |
1 |
17 |
|||
|
4-6 |
1 |
18 |
|||
|
2-3 (seamless) |
1 |
19 |
|||
|
FCRN4 |
150Х25 + 300Х25 |
10-12 |
1 |
27 |
0,458 |
|
8-10 |
1 |
29 |
|||
|
4-6 |
1 |
33 |
|||
|
2-3 (seamless) |
1 |
26 |
PREPARATION OF ADHESIVE MIXTURE
FOR INSTALLING FLEXIBLE TILES AND FILLING JOINTS IN ONE WORK CYCLE
|
After preparing and marking the working surface, proceed to preparing the tile adhesive-grout.
Mix the PB-186 dry mixture with clean cool water, according to the proportion, until a homogeneous plastic mass is obtained: 4.4-4.8 l of water per 20 kg of the mixture (0.23+-0.01 l of water per 1 kg of dry mixture).
The procedure for mixing the PB-186 adhesive mixture with a mixer: add water, pour 2/3 of the bag into the container, stir at low speeds up to 1000 rpm (perforator revolutions). After the mixture is completely moistened, add the remaining 1/3 of the dry mixture, mix until the solution mass is homogeneous. During mixing, prevent foaming and lumping. Before use, let stand for at least 5 minutes and mix a second time for 1-2 minutes without adding water.
|
 |
|
ATTENTION!
Level the adhesive on the wall with a 6 mm notched trowel.
Never leave vertical grooves of adhesive after passing the notched trowel along the wall. Always make the last pass with the trowel with horizontal lines to avoid water getting under the tiles. Such a violation will cause the tiles to lag behind on the facade.
|
 |
Begin grouting the joints 20-30 minutes after installing the tiles, when the adhesive mixture in the joints has reached the consistency of wet sand. This time may vary depending on temperature conditions.
FACING CORNERS AND SLOPES WITH FLEXIBLE TILES
The method of joining tiles at the corner “sharpen at 45 ֯” – for facing the external corners of the house, the manufacturer of flexible tiles offers a ready-made corner designer (UK), consisting of two elements (short and long), cut to the required size, with sharpened joints at 45 ֯. You can make such a corner designer yourself:
|
Take one whole tile (spoon) and one tile to cut into halves (sticks). Measure the required size of the stick, according to the tile format. Make a cut on the back of the tile with a construction knife. Press lightly on the cut to break the tile into halves. |
 |
 |
On the back of the tile, clean the places where the spoon and stick join at a 45° angle using a knife or grinder. |
The “sharpen at 45 ֯” miter cut method is suitable for tiles 4-6 mm thick: FC4, FCL4, FCRL4, FCO4, and FCRN4. FB3 and FCR3 tiles (2-4 mm thick) are best laid without the 45° miter cut, using an with an overlap with alternating rows.
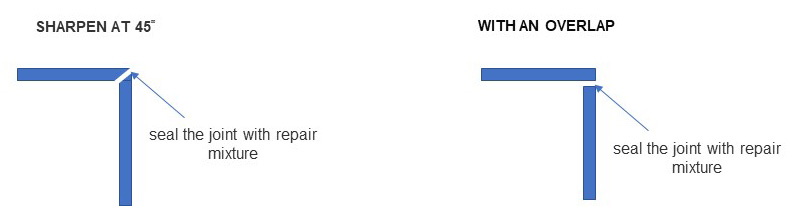
The joints of the corner constructor are sealed with a repair mixture to protect them from atmospheric influences and to achieve an aesthetic appearance of the corner.
|
Start laying tiles from the top corner of the house to avoid adhesive residue getting on the lower rows of tiles.
Apply glue-grout to the corner of the house at the height of the markings.
Smooth the grout adhesive with a 6 mm notched trowel.
|
|
|
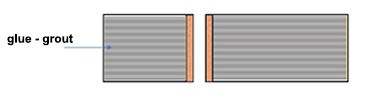
Apply the adhesive-grout to the back of the tile with a spatula. The entire inside of the tile should be evenly covered with a 1 mm layer of adhesive. |
 |
|
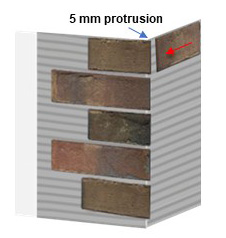
Moving from top to bottom, alternating between the spoon and the sticks, glue the corner elements on one side of the corner to the height of the marking. Leave a 5 mm overhang on the corner to overlap the tiles on the other side. Measure the width of the joints with a trowel.
Then install the corner elements on the other side of the corner, joining the two halves of the corner element with joints.
|
 |
 |
 |
|
Press the tile into the adhesive with an offset by hand to avoid voids under the tile.
Seal the joints of the corner elements with repair compound after grouting the joints.
|
|
Finishing of openings:
|
A ready-made corner sloper (UKV) is ordered for tiles with a thickness of 4-6 mm. It consists of two whole tiles, in which the joints at the corner are sharpened at 45 ֯
A corner slope can also be made independently, according to the principle of making a corner designer (UK).
|
|
|
Corner slopes are cut on site to the slope dimensions.
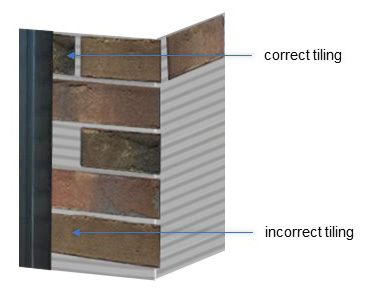
If the slope depth is greater than the length of the post, cut the tile and apply it in small pieces as shown in the picture.
Lay the tiles on the slopes in the same order as when finishing the corners.
Seal the joints of the corner slopes with the repair mixture after grouting the joints.
|
 |
REPAIR MIXTURE
Seal the joints between the two corner pieces with a repair compound matching the tile color and clean the corner of any remaining residue with a soft brush. You can use the same method to paint over any stains or repair flexible tiles. Once dry, the repair compound will be invisible on the surface of the tile being treated.

Sealing the joints of corner joints with a repair compound protects them from atmospheric influences. The repair compound is supplied ready to use. Store the compound in a closed container to prevent it from drying out. Use clean water to dilute the compound.
TILE INSTALLATION
|
Flexible tiles are installed in the traditional way of laying clinker tiles. Cut the tiles with a construction knife. Apply the adhesive solution to the wall surface within the markings and level it with a 6 mm notched trowel. Adhesive mortar mixtures should be applied to such an area of the base that can be tiled within 10-15 minutes. Carefully apply a 1 mm layer of adhesive to the back of the tile over the entire surface. The tile cannot be wetted. |
|
|
Lay the tiles from the corner elements along the wall. Follow the surface markings, measure the joints with a trowel. Press the tiles into the adhesive with an offset to avoid voids under it.
Tiles laid in the design position can be adjusted within 10-15 minutes after laying.
|
 |
|
The ends of flexible tiles where they meet other finishing materials should be coated with a repair compound in the color of the tile. Use masking tape to avoid contamination of adjacent materials: |
|

To optimize the tiling process, a three-person team is created: two technicians lay the tiles on the façade, and one person mixes the adhesive mixture and performs auxiliary tasks. The speed and quality of flexible tile installation depends on the experience of the technicians and gradually increases. It is recommended to install tiles on the façade in the most inconspicuous areas first, gradually moving on to central sections. The speed of façade tiling (including grouting) can reach 60-70 m² per shift with a team of three experienced technicians.
It’s important to remember that variations in the color and pattern of flexible tiles arise from the manufacturing process. These variations give a façade laid with flexible clinker a natural appearance. When laying multiple colors of tiles, use the manufacturer’s color chart or create your own color schemes to suit your taste. To ensure an even distribution of colors across the entire surface, alternate tiles from different packages.
It’s advisable to purchase products from the same production batch. Flexible tiles purchased additionally, 6 months or more later, may differ in color from those purchased earlier. It’s important to first correctly calculate the required quantity of flexible tiles, allowing for trimming.
METHOD OF GROUTING SEAMS
|
You can start grouting the joints with adhesive-grout (component No. 3) no earlier than 20-30 minutes after gluing the tiles, when the mixture in the joints will have the consistency of wet sand and will behave like plasticine when pressed with a finger.
If the pause is not observed, the tile will be contaminated with glue, and an undesirable shine will appear on the surface of the joints. The duration of the pause may vary depending on the temperature and humidity of the environment. |
 |
|
Without excessive pressure, run the trowel over the surface of the joint and remove any excess adhesive that protrudes above the joints. Smooth the joint again with the trowel. Clean the tile from any remaining adhesive-grout with a stiff brush. |
|
 |
|
Tips: When laying tiles, it’s impossible to achieve a precisely uniform joint size. Due to the need to compensate for linear tile deviations (up to +/- 2 mm), as well as to aesthetically even out the visual thickness of the joints, it’s common practice to use two sizes of trowels. For example, for a 10-12 mm joint, two trowels are needed: one 10 mm and one 12 mm.
|
To simplify the process of grouting joints, use a grinder to cut the metal part of the trowel to a length of 5-6 cm and make a slight bend, as shown in the picture: |
 |
ATTENTION! During interruptions in work, the seams must be closed. Fresh seams are protected from rain and moisture, drafts, strong wind, frost, and direct sunlight with a vapor-impermeable film for 72 hours from the moment of stitching the seams to ensure normal temperature and humidity conditions for hardening. Keeping masonry joints wet guarantees their uniform drying and color fading burning. Do not wipe fresh seams with a wet sponge!
ACTIONS CONSIDERED A GROSS VIOLATION OF THE RULES FOR USE OF THE MATERIALS OF THE “CLINKER PLUS” SET
- destruction of joints
- washing of adhesive from joints, resulting in streaks on the façade
- formation of a cloudy film on the flexible tile surface from the polymers contained in the adhesive
 |
Under no circumstances should you cover the joints, and especially the surface of flexible tiles, with a water repellent. It does not provide long-term protection for the joints and is an aggressive environment for the surface of the polymer material.
The photo shows how the color of the flexible tile changed after spraying Ceresit CT 13 water repellent on it. A whitish coating appeared on the surface of the black tile.
Places where almost no water repellent got remained unchanged in color.
|
In the Technical description of Ceresit CT 13 silicone hydrophobizer, it is indicated that this product is not intended for coating polymer materials:

These dyes are non-toxic, have high quality, and are weather-resistant. Compared to other pigments, they do not fade in direct sunlight, so they are added to materials to impart color stability. Due to their properties, these dyes are used in the production of many construction products, including concrete tinting. Some of these pigments are used in the food industry. However, iron-oxidizing pigments react slowly with acids and react more harshly with alkalis.
|
flexible tiles and joints with salts |
flexible tiles and joints after treatment with Sikagard acid-based leach cleaner |
 |
 |
If the appearance of the grout and flexible tiles differs from their original state, with visible color changes to unnaturally bright colors and increased contrast, this is the first sign that the façade has been treated with acid-containing materials. The appearance and increased contrast of tiles and grout appears immediately after exposure to acid, all other changes occur gradually over a period of 1 to 5 years.
- Initial discoloration of the flexible tile and grout to a brighter, more contrasting color
- Further formation of a whitish (sometimes yellowish) coating on the tile surface
- Destruction (scalding) of the flexible tile surface with surface delamination
- Formation of cracks on the tile and grout surface due to acid attack
- Destruction of grout with surface delamination
- Formation of adhesive mixture streaks on the façade due to grout being washed out of the joints
- Formation of a cloudy film on the flexible tile surface from the polymers contained in the grout
- Immediately wash the façade with plenty of running water
- After drying, coat the façade with a water-soluble acrylic varnish
- If a whitish coating has already appeared on the tiles, wash the façade with running water and a brush, and after drying, paint it with a water-soluble acrylic paint
- In advanced cases, when cracks from acid attack are visible in the tiles and grout, the tiles must be removed
HOW TO CLEAN FLEXIBLE TILES
REQUIREMENTS TO THE QUALITY OF WORKS
CONDITIONS OF TRANSPORTATION AND STORAGE
SAFETY REQUIREMENTS
Do not eat, drink or smoke while handling these products. When using, follow the manufacturer’s instructions.
Tile adhesives and grout are cement-based, so wear eye and respiratory protection when working with them. If adhesive gets into your eyes, rinse immediately with water and seek medical attention.
The installation instructions are the rules for using the materials of the Klinker Plus. This is a regulatory document of a technical nature, establishing rules for handling products to maintain their performance and rules for safe use of materials.
The manufacturer of the components included in the “Clinker Plus” kit guarantees that these materials meet the specified technical specifications, provided that the rules of transportation, storage, installation and operation instructions given in the Installation Technological Card are followed. The manufacturer is not responsible for damage to the kit materials caused by their use for purposes other than those intended and under conditions not provided for in this manual. From the moment this manual appears, all previous ones become invalid.